So I decided that I needed a dining table that could seat at least six people but when I looked in the catalogues and in furniture shops I just could not bear to pay the price they were asking for a flimsy bolted together table. I wanted something that could stand up to the traffic it would get as a everyday dining table, which meant I needed to build it because what I could find that would meet my requirements was going to cost 1000's.
So I sketched out what I wanted after inspecting rather closely how my formal dining table was made. Did the calculations for the wood required and off to Bunnings I went. At this stage I only purchased the wood required to complete the legs, aprons and bracing for the frame.
I had last week off as annual leave, due to kids being on school holidays, with grand plans in tow. I started my table hoping that by the end of the week in between the kids activities I would get the frame completed.... did that happen ummmm No.
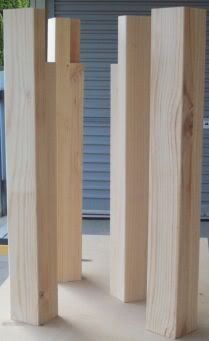
I did however get the legs done and fine sanded, I also filled in the knot holes and fine sanded the aprons, so they are virtually ready to put together. So here are the legs all sanded and knotched ready for the aprons to be attached.
The legs are made from 2 peices of 35 x 90mm structural pine joined together with construction adhesive (aka Liquid Nails) and counter sink screws. To ensure I got a flat surface for the joining faces once I cut to length, I ran them through my Jointer to plane the surfaces nice and flat eliminating the rounded edges found on structural pine. In a future post I will talk more about my jointer and what you use one of these for.
Until next time Happy Building


No comments:
Post a Comment